Author: blockparty
Protected: Security Relevant DNS Records
Protected: Install OpenVAS on Alma Linux 9.x
Protected: LVM non-root partition disappeared from a new RHEL 9.x guest VM
Protected: Activating the Intel VT Virtualization Feature
Protected: VirtualBox headless VM autostart
Protected: Partition and format a data disk larger than 2 TiB in size in Redhat Linux
Protected: Install VirtualBox and phpVirtualBox on CentOS 7
Protected: How To Set Up Multi-Factor Authentication for SSH on CentOS 7
Installing OpenSSL on CentOS 7
OpenSSL is a robust, commercial-grade, and full-featured toolkit for the Transport Layer Security (TLS) and Secure Sockets Layer (SSL) protocols. It is also a general-purpose cryptography library.
OpenSSL is used by many programs like Apache Web server, PHP, and many others providing support for various cryptographic algorithms such as ciphers (AES, Blowfish, DES, IDEA etc.), and cryptographic hash functions (MD5, MD4, SHA-1, SHA-2 etc.)
In this guide, we are going to install the latest version of OpenSSL on CentOS 7.
Updating System Packages on CentOS
It is always recommended that you update the system to the latest packages before beginning any major installations. This is done with the command below:
yum update
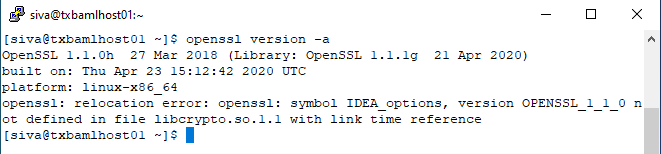
Before we begin our installation, you can check the version of OpenSSL installed on your server by issuing the command below:
openssl version -a
Step 1: Install Development Tools
The “Development tools” are a yum group, which is a predefined bundle of software that can be installed at once, instead of having to install each application separately. The Development tools will allow you to build and compile software from source code. Issue the command below to install:
yum group install 'Development Tools'
Issue the following command below to install other necessary packages and libraries.
yum install perl-core zlib-devel -y
Step 2: Download OpenSSL
Next, we are going to download OpenSSL from the source (getting the latest version which at the time of writing this guide, the latest stable version is the 1.1.1 series).
cd /opt/downloads
wget https://www.openssl.org/source/openssl-1.1.1g.tar.gz
Next, extract the downloaded file into /opt using the command below:
tar -xf /opt/downloads/openssl-1.1.1g.tar.gz
Next, navigate to the extracted directory.
cd /opt/openssl-1.1.1g
Step 3: Install OpenSSL
We are now going to install the latest version of OpenSSL which we downloaded using the command below:
./config --prefix=/usr/local/ssl --openssldir=/usr/local/ssl shared zlib
make
make test
make install
Step 4: Configure OpenSSL Shared Libraries
Naviagate to the /etc/ld.so.conf.d directory and create a new configuration file ‘openssl-1.1.1c.conf’. Remove or move the previous version config files.
cd /etc/ld.so.conf.d/
nano openssl-1.1.1g.conf
Enter the following:
/usr/local/ssl/lib
Ensure to save before you exit.
Next, reload the dynamic link by issuing the command below:
ldconfig -v
Step 5: Configure OpenSSL Binary
In our final configuration, we are going to insert the binary of our new version of OpenSSL installed (located at /usr/local/ssl/bin/openssl) to replace the default openssl binary (located at /usr/bin/openssl or /bin/openssl).
First, backup the default OpenSSL binary files.
mv /bin/openssl /bin/openssl.backup
Next, create new environment files for OpenSSL:
nano /etc/profile.d/openssl.sh
Enter the following:
#Set OPENSSL_PATH
OPENSSL_PATH="/usr/local/ssl/bin"
export OPENSSL_PATH
PATH=$PATH:$OPENSSL_PATH
export PATH
Ensure to save before you exit.
Next, make the openssl.sh file executable by issuing the command below:
chmod +x /etc/profile.d/openssl.sh
Next, reload the OpenSSL environment and check the PATH bin directory using commands below:
source /etc/profile.d/openssl.sh
echo $PATH
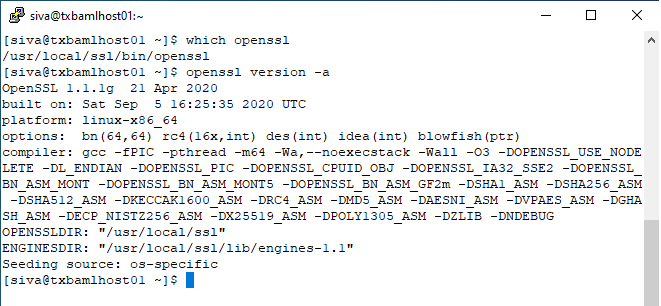
We can now check and verify our installation of the latest stable version of OpenSSL using the command below:
 which openssl
 openssl version -a