
Author: blockparty
Protected: Install and Configure Graylog Server on CentOS 7
Protected: Send HTTPd logs to Graylog Server via rsyslog daemon
OAUTH phishing against Google Docs ? beware!
Published: 2017-05-03
Last Updated: 2017-05-03 19:54:08 UTC
by Bojan Zdrnja
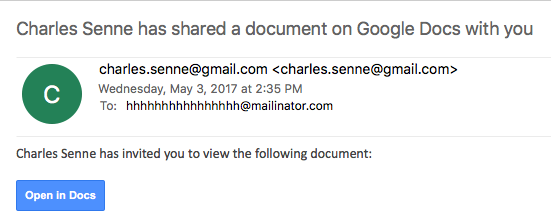
We got several reports (thanks to Seren Thompson, Tahir Khan and Harry Vann) about OAUTH phishing attacks against Google users. The phishing attack arrives, of course, as an e-mail where it appears that a user (potentially even one on your contact list, so it looks very legitimate) has shared a document.
An image of such an e-mail is shown below:
If you click on the link (Open in Docs), you will be redirected to the OAUTH2 service on accounts.google.com – the target URL will look like this:
hxxs://accounts.google.com/o/oauth2/auth?client_id=1535050614-8i934kb9l0snc0iocqb0iv27lli0r858.apps.googleusercontent.com&scope=https%3A%2F%2Fmail.google.com%2F+https%3A%2F%2Fwww.googleapis.com%2Fauth%2Fcontacts&immediate=false&include_granted_scopes=true&response_type=token&redirect_uri=hxxps%3A%2F%2Fgoogledocs.g-docs.win%2Fg.php&customparam=customparam
In browser, this is what you get:
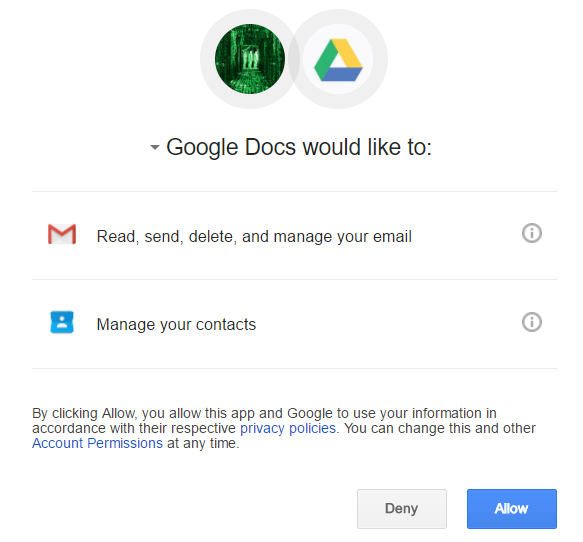
As you can see, it appears as Google Docs wants full access to my Gmail as well as my contacts. Of course, this is not real Google Docs – the attacker has simply named his “application” Google Docs – this can be verified by clicking on the Google Docs text where the real web site behind this and developer info is shown:
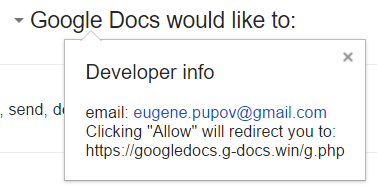
Obviously, once you allow access it is game over – the attacker probably uses the phishied Gmail account to further distribute phishing e-mails – we’ll see if we can get more details.
So far at least the following domains are included:
googledocs.g-docs.win
googledocs.g-docs.pro
The domains are definitely malicious – the URL leads to jsserver.info where a fake alert that the computer is infected is shown.
UPDATE:
There are more domains – they all just change the TLD’s for googledocs.g-docs.X or googledocs.docscloud.X. Most of them (if not all) appear to have been taken down (thanks @Jofo).
It also appears that Google has reacted quickly and are now recognizing e-mails containing malicious (phishing) URL’s so the message “Be careful with this message. Similar messages were used to steal people’s personal information. Unless you trust the sender, don’t click links or reply with personal information.” will be shown when such an e-mail is opened.
Finally, if you accidentally clicked on “Allow”, go to https://myaccount.google.com/u/0/permissions?pli=1 to revoke permissions.
CAA Records and Certificate Issuance
[This is a guest diary submitted by J. Edward Durrett, GCUX]
While going over an SSL report from SSL Labs [1], I noticed something that I had not seen before: a check for CAA records. Certification Authority Authorization (CAA) is a DNS record which restricts which Certificate Authority can issue a certificate for a given domain [2]. Let’s say I get all my Certificates for example.org from Certificate_authority.com. I can specify in my DNS that only Certificates issued by Certificate_authority.com are valid for my domain. This is done with a CAA record, which looks like this in my domain’s zone le:
example.org. CAA 0 issue "certificate_authority.com"
CAA support is going to become a mandatory standard in Certificate issuance in September 2017 [2]. That means, in the process of Certificate issuance, it will be mandatory that the the Certificate Authority check for the existence of CAA records for the domains they are issuing Certificates to [3] [4]. Consequently, if you don’t have a properly formatted CAA record for your domain, you might not get a Certificate.
Although it remains to be seen how Certificate Authorities implement this standard, failure to have a CAA record for a domain, or having an improperly formatted CAA record, may cause automated Certificate management to fail unexpectedly. This, of course would leave sites with expired/missing Certificates.
For sites running their own DNS, adding a CAA record to the zone is all that is needed. Current versions of BIND, for example, support CAA records so this can be done now. Procedures and scripts for setting up new domains need to be updated to reflect the additional step of adding CAA record before attempting to obtain a Certificate. In addition, in the event of changing Certificate Authorities, the CAA record would also need to be updated to reflect the new issuer.
For organizations that rely on third party DNS providers, the case is different. From a quick search of support pages, I only found a couple that support CAA records [5] [7]. That will probably change as September gets closer, but having a backup plan is never a bad idea.
The best reference document for I found CAA is RFC 6844 DNS Certi cation Authority Authorization (CAA) Resource Record [3]. The example I have above will work for most sites. The structure of a CAA is like this:
CAA
There are some things to note. It is possible for a domain to have more than one CAA record:
example.org. CAA 0 issue "letsencrypt.org"
example.org. CAA 0 issue "comodo.com"
This would allow a Certificate to be issued from letsencrypt.org or comodo.com. This is useful in cases where the Certificate for the smtp server is issued by letsencrypt.org and the web server uses one from comodo.com.
There are three properties which can be specified issue, issuewild, or iodef [3]. issue means a Certificate Authority is allowed to issue a Certificate for the domain. To completely bar Certificates being issued for a domain, this configuration is possible:
example.org. CAA 0 issue ";"
To only allow wild card Certificates, ones that would match *.example.org, to be issued, the issuewild property is used:
example.org. CAA 0 issuewild "certificate_authority.com"
For reporting, the iodef property can be specified. This tells the Certificate authority to send a report to either an email or an http/https service [3]:
example.org. CAA 0 issue "certificate_authority.com"
example.org. CAA 0 iodef "mailto:security@example.org"
example.org. CAA 0 iodef "https://iodef.example.org/"
In the above example, Certificate_authority.com can issue a Certificate for example.org and then Certificate_authority.com is directed to send an IODEF incident report to security@example.org and to the web service at https://iodef.example.org.
In all of the configuration examples above the flag is set as 0. Setting the flag to 128 instructs the Certificate Authority that the property is critical [3]. That is, the Certificate Authority must understand the property before issuing a Certificate.
Each Certificate Authority has some latitude to determine additional information, such as the type of Certificate or an account number, that can be specified in CAA records [3]. So it is important to check the documentation with the relevant issuer and to keep abreast of changes during implementation. And, as with everything, always test these configurations before putting them into production.
The go-to tool on Linux for checking DNS records is dig. However, dig does not yet support CAA records with the -t flag, so to check a domain type257 needs to be specified [5]:
$dig google.com type257
;; QUESTION SECTION:
;google.com.
IN TYPE257
;; ANSWER SECTION:
google.com.
0005697373756573796D616E7465632E636F6D
google.com.             86399   IN
00056973737565706B692E676F6F67
$drill google.com CAA
;; QUESTION SECTION:
;; google.com. IN CAA
;; ANSWER SECTION: google.com. 86400 IN CAA google.com. 86400 IN CAA
0 issue "pki.goog"
0 issue "symantec.com"
86399
IN
TYPE257 \# 19
TYPE257 \# 15
By piping the encoded output through xxd, we can see the property and issuer the record specifies:
$echo "00056973737565706B692E676F6F67" | xxd -r -p
issuepki.goog
The drill utility, found on FreeBSD, does support querying CAA records:
There is also a program written in Go called dnscaa which can be found on GitHub [6].
I searched through several domains looking for CAA records. This was not an exhaustive or scientific search, just a handful of domains. Outside of Certificate Authorities like Comodo and Symantec, Google was the only domain I found with CAA records. Considering that Let’s Encrypt alone has issued Certificates for close to 35 Million domains [8], there is likely a significant portion of administrators who have not published CAA records. As issuers reach out to their customers, I would expect to see more records published in the coming months.
The addition of CAA records to DNS and the critical role they will play in Certificate issuance makes an already key part of infrastructure even more valuable. Both the suppression and spofing of records being sent to the Certificate Authorities could result in an attacker obtaining an unauthorized Certificate or causing a denial of service condition [3]. Communicating with Certificate Authorities certainly would justify a method of signing and validating DNS records. Luckily, there already is such a method – DNSSEC.
Interestingly, this may ( finally!) encourage the wide spread adoption of DNSSEC. Although RFC 6844, says in section 4.1 the use of DNSSEC “is strongly RECOMMENDED but not required”, it goes on to say in section 6.4 “Where possible, issuers SHOULD perform DNSSEC validation to detect missing or modified CAA record sets.” [3]. If deploying DNSSEC is something that you have been putting o for the last 20 years, this might be a good time to revisit.
In conclusion, the CAA record type is relatively new to DNS yet with up to date infrastructure in place it is fairly easy to implement. The lack of CAA support by third party DNS providers might prove challenging for some organizations. As issuers roll out their policies for CAA validation, the impact of RFC 6844 will become clearer. There is plenty of time between now and September to test and adopt procedures for dealing with CAA and its role in Certificate issuance.
J. Edward Durrett, GCUX
[1] https://www.ssllabs.com/ssltest/index.html
[2] https://blog.qualys.com/ssllabs/2017/03/13/caa-mandated-by-cabrowser-forum [3] https://tools.ietf.org/html/rfc6844
[4] https://cabforum.org/pipermail/public/2017-March/009988.html
[5] https://support.dnsimple.com/articles/caa-record/
[6] https://github.com/weppos/dnscaa
[7] https://cloud.google.com/dns/overview#supported_dns_record_types
[8] https://letsencrypt.org/stats/
Getting Ready for macOS Sierra: Upgrade Securely
Published: 2016-09-11
Last Updated: 2016-09-11 21:08:26 UTC
by Johannes Ullrich (Version: 1)
Apple is expected to release the next version of its operating system on or around September 20th, 2016 [1]. The current version of OS X, 10.11, or also known as “El Capitan” has been updated several times with various bug fixes. Currently, you should be running 10.11.6. It is possible that when Apple releases “Sierra”, another bug fix and security update will be released for “El Capitan”.
To find what version of OS X you are running, select “About this Mac” by clicking on the logo in the upper right-hand corner.
We will cover the upgrade process only at this point. Most users will receive macOS Sierra as an Upgrade and not install it from scratch. But I bet some of the tips here apply to regular installs as well. To make this guide as generic as possible, I used a plain install of OS X El Capitan without any significant adjustments (I swapped backgrounds for a plain blue one to make the screen shots simpler).
I will not cover features that remained the same (e.g. FileVault).
The initial upgrade via the App Store is simple, and there are no options to choose. You download and install macOS Sierra and reboot your system once you are done. We start this guide after the first log-in after the upgrade.
If multiple users use a system, then each user has to follow the same procedure.
iCloud Credentials
After logging in, you are asked for iCloud credentials. There is an option to skip this step, but I opted for entering iCloud credentials. Many of the privacy issues with OS X are related to iCloud. But at the same time, many features are linked to iCloud. I doubt many users will disable iCloud.
iCloud Keychain
Next, you will be asked to set up iCloud Keychain. I opted against this. The iCloud Keychain will synchronize your OS X keychain across devices. You may still use the keychain locally without synchronization. According to Apple, the keychain is encrypted before it is uploaded to the cloud [2]. But anybody with access to your iCloud password will be able to access your keychain and with that, all passwords stored in your keychain. Please make sure to use a strong password and enable two-factor authentication before enabling the iCloud Keychain. Apple requires that you set-up a “Security Code” when setting up the iCloud Keychain.
iCloud Shared “Document” and “Desktop” Folder
During your first login, you are asked if you would like to store files from the “Documents” and “Desktop” folder on your iCloud drive. I opted out of this option. This feature may expose files to iCloud that you are not willing (or authorized) to share on cloud-based services.
Siri
macOS Sierra comes with Siri enabled by default. Not everybody may be comfortable with having Siri listen in. Just like on iOS, Siri uses a cloud-based service to analyze voice commands. Siri was disabled by default for me, and you can remove the Siri icon from the dock by right-clicking it and selecting “Options” => “Remove from Dock”. Siri can also be managed from a dedicated settings dialog.
To verify that Siri is disabled, check the “Siri” dialog in “System Preferences”. The “Enable Siri” checkbox should be unchecked.
Apple Watch Screen Unlock
If you own an Apple Watch, and upgraded it to WatchOS 3, then you will be able to unlock your system using your watch. Connecting your watch will only work if you have two-factor authentication enabled for your account, and your watch has to be secured with a passcode. By default, the feature is turned off. You should be able to enable the Apple Watch unlock in the “Security & Privacy” part of the Settings dialog. But lacking a compatible watch I wasn’t able to see the dialog.
Continuity / Universal Clipboard
Continuity existed in OS X El Capitan and allows sharing content between iOS and OS X devices. One significant new security relevant feature in macOS Sierra is the ability to unlock the screen with your Apple Watch. There is also a cross-device Clipboard to copy/paste between devices. The clipboard could expose sensitive content to other devices, for example if you copy/paste passwords from a password wallet type application. There appears to be no easy way to disable these features. For them to work, you need to link all devices to the same iCloud account, and then enable Wi-Fi as well as Bluetooth on all devices.
Optimized Storage
macOS Sierra can move files to iCloud to save disk space. For files like iTunes movies and music, which you downloaded from Apple, this is probably less of an issue. But it may also affect other files that haven’t been opened in a while. To review optimized storage settings, click on “About this Mac” in your menu. Then select “Storage” and click on the “Manage” button. The “Recommendations” menu will allow you to turn on some of these features. To turn them off, you will need to disable them in your iCloud settings, or for the automatic trash delete, in Finder’s preferences (“Preferences” => “Advanced”)
Gatekeeper
Gatekeeper limits which applications a user may execute. OS X El Capitan had three settings: “Mac App Store”, “Mac App Store and identified developers”, and “Anywhere”. macOS Sierra lost the last option. Instead, if you try to launch an unsigned application, you need to open the “Security & Privacy” dialog, and then you will have to allow the application to run. You will only have to do this the first time you run the application. This behavior is identical to OS X El Capitan. macOS Sierra also relabeled the options to “App Store” instead of “Mac App Store”.
Summary
The privacy and security changes in macOS Sierra come from its tighter integration with iCloud. Cloud integration is an industry wide trend and not just specific to Apple. Which documents and what data you want to share with cloud services should be carefully evaluated, and the security of cloud accounts will become more and more important. Two-factor authentication is an absolute must, no matter if it is iCloud, Dropbox or OneDrive. Traditional passwords are too easily lost in phishing attacks. Phishing attacks against cloud credentials can be very targeted and convincing. Two-Factor authentication provides some protection against these attacks.
Many of the existing security features in OS X remain the same, like for example FileVault and various other iCloud based services like “Back to my Mac”. Please consult various OS X hardening guides for advice.
[1] http://www.apple.com/macos/sierra/
[2] https://support.apple.com/en-us/HT202303
The Dark Side of Certificate Transparency
I am a big fan of the idea behind Certificate Transparency [1]. The real problem with SSL (and TLS… it really doesn’t matter for this discussion) is not the weak ciphers or subtle issues with algorithms (yes, you should still fix it), but the certificate authority trust model. It has been too easy in the past to obtain a fraudulent certificate [2]. There was little accountability when it came to certificate authorities issuing test certificates, or just messing up, and validating the wrong user for a domain based on web application bugs or social engineering [3][4].
With certificate transparency, participating certificate authorities will publish all certificates they issue in a log. The log is public, so you can search if someone received a certificate for a domain name you manage.
You can search certificate transparency logs published by various CAs directly, or you can use one of the search engines that already collect the logs and use them to search [1].
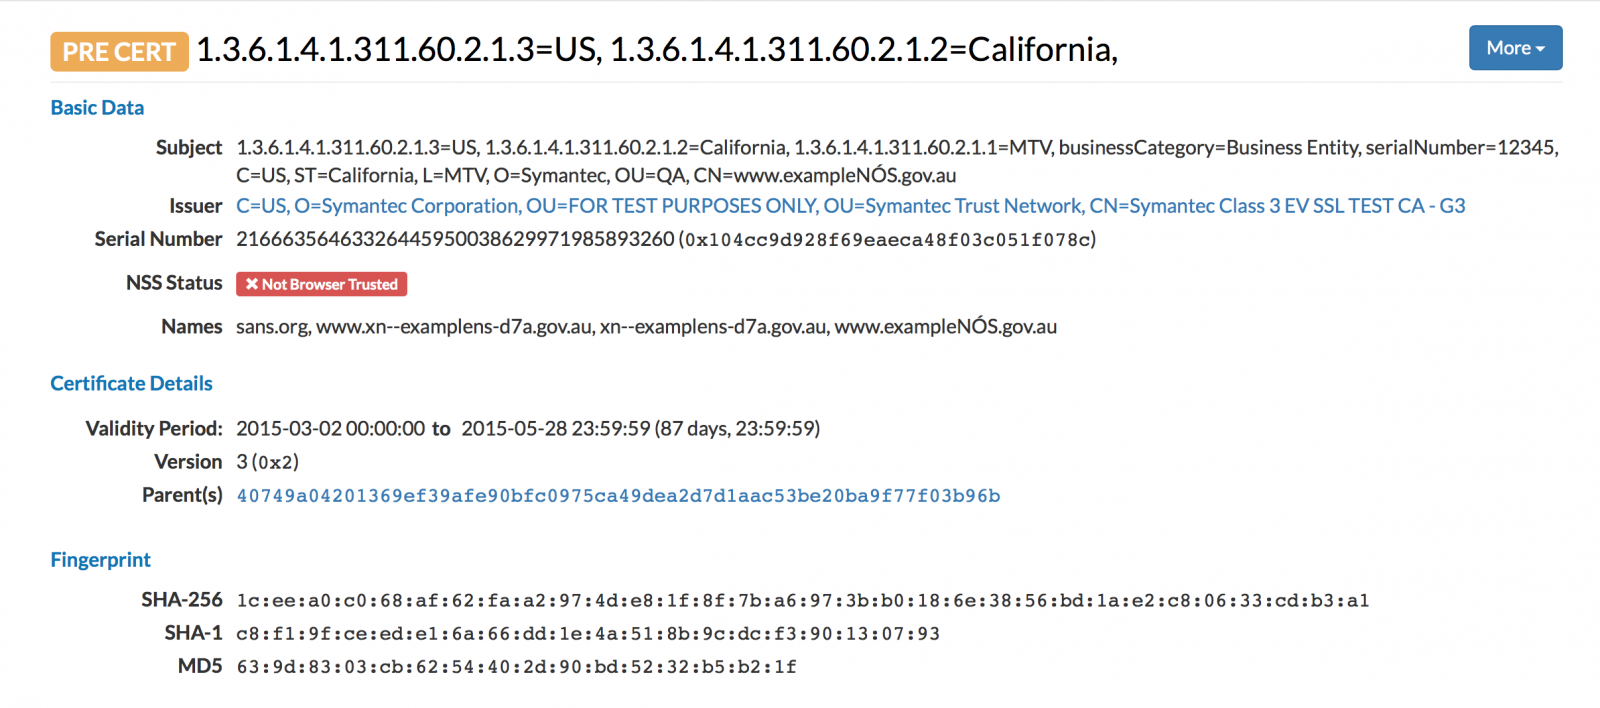
For example, here is an “interesting” certificate for “sans.org”, issued by the infamous Symantec test CA [5].
So what is the “dark side” part?
Many organizations obtain certificates for internal host names that they do not necessarily want to be known. In the past, internet wide scans did catalog TLS certificates, but they only indexed certificates on publicly reachable sites. With certificate transparency, names may leak that are intended for internal use only. Here are a few interesting CNs I found:
vpn.miltonsandfordwines.com
upstest2.managehr.com
mail.backup-technology.co.uk
To find these, I just searched one of the Certificate Transparancy Log search engine, crt.sh , for “internal”.
There are currently two options considered to “fix” this problem:
– Allow customers to opt out of having their certificate logged. This is a bad idea. Malicious customer would certainly opt out.
– Redact sub-domain information from the log. This is currently in the works, but the current standard doesn’t support this yet. In the long run, this appears to be a better option.
But you should certainly regularly search certificate transparency logs (or any scans for SSL certificates) for your domain name to detect abuse or leakage of internal information.
[1] https://www.certificate-transparency.org
[2] https://security.googleblog.com/2015/03/maintaining-digital-certificate-security.html
[3] http://oalmanna.blogspot.ro/2016/03/startssl-domain-validation.html
[4] https://thehackerblog.com/keeping-positive-obtaining-arbitrary-wildcard-ssl-certificates-from-comodo-via-dangling-markup-injection/index.html
[5] https://censys.io/certificates/1ceea0c068af62faa2974de81f8f7ba6973bb0186e3856bd1ae2c80633cdb3a1
Verifying SSL/TLS certificates manually
by Bojan Zdrnja
I think that we can surely say that, with all its deficiencies, SSL/TLS is still a protocol we cannot live without, and basis of today’s secure communication on the Internet. Quite often I get asked on how certificates are really verified by browsers or other client utilities. Sure, the canned answer that “certificates get signed by CA’s and a browser verifies if signatures are correct” is always there, but more persistent questions on how it exactly works happen here and there as well.
So, if you ever wondered on how a certificate could be fully manually verified by checking all the steps, this is a diary for you! In this example we will manually verify the certificate of the site you are reading this diary on, https://isc.sans.edu. We will use the openssl utility so you can replicate all the steps for any certificate on any machine where you have openssl. Here we go.
In order to get the certificate we want to verify we can simply connect to https://isc.sans.edu with the openssl utility. For that, the s_client command will be handy and it will print out the certificate in PEM format on the screen so we just have to catch it and put it into a file:
$ openssl s_client -connect isc.sans.edu:443 < /dev/null | sed -ne ‘/-BEGIN CERTIFICATE-/,/-END CERTIFICATE-/p’ > isc.sans.edu.pem
The isc.sans.edu.pem file now contains the certificate from isc.sans.edu. We could try to verify it with openssl directly as shown below:
$ openssl verify -verbose isc.sans.edu.pem
isc.sans.edu.pem: C = US, postalCode = 20814, ST = Maryland, L = Bethesda, street = Suite 205, street = 8120 Woodmont Ave, O = The SANS Institute, OU = Network Operations Center (NOC), OU = Unified Communications, CN = isc.sans.edu
error 20 at 0 depth lookup:unable to get local issuer certificate
Hmm, no luck. But that is because the CA file that comes with Linux by default is missing some of the intermediates. Those either have to be in the CA store, or the server has to deliver the whole chain to us when we initially connect. Ok, not a problem – let’s continue manually.
First we can see who the issuer really here is, and what are the certificate’s parameters:
$ openssl x509 -in isc.sans.edu.pem -noout -text
Certificate:
Data:
Version: 3 (0x2)
Serial Number:
24:21:68:a7:55:13:74:1a:d1:95:fb:62:26:90:c9:1d
Signature Algorithm: sha256WithRSAEncryption
Issuer: C=GB, ST=Greater Manchester, L=Salford, O=COMODO CA Limited, CN=COMODO RSA Organization Validation Secure Server CA
Validity
Not Before: Apr 7 00:00:00 2015 GMT
Not After : Apr 6 23:59:59 2018 GMT
Subject: C=US/postalCode=20814, ST=Maryland, L=Bethesda/street=Suite 205/street=8120 Woodmont Ave, O=The SANS Institute, OU=Network Operations Center (NOC), OU=Unified Communications, CN=isc.sans.edu
Ok, so the certificate is valid, and it is signed by Comodo, as you can see in the highlighted line. The part that matters to the browsers is actually only the CN component. In the Subject field we can see that the CN matches our site (isc.sans.edu) and in the Issuer field we can see that that signing CA (which is an intermediate CA) is called COMODO RSA Organization Validation Secure Server CA.
We can verify this information in the RFC2253 format as well, for both the subject and issuer; this will be easier to read:
$ openssl x509 -in isc.sans.edu.pem -noout -subject -issuer -nameopt RFC2253
subject= CN=isc.sans.edu,OU=Unified Communications,OU=Network Operations Center (NOC),O=The SANS Institute,street=8120 Woodmont Ave,street=Suite 205,L=Bethesda,ST=Maryland,postalCode=20814,C=US
issuer= CN=COMODO RSA Organization Validation Secure Server CA,O=COMODO CA Limited,L=Salford,ST=Greater Manchester,C=GB
So, let’s first try getting the CAcert file that is used by Mozilla. This might help us verify everything. That being said, getting the CAcert file from Mozilla is not all that trivial and some extractions/conversions should be done. Luckily, the good folks at curl already publish the cacert file in the PEM format so we can get it from their web; it’s available at https://curl.haxx.se/docs/caextract.html
$ curl https://curl.haxx.se/ca/cacert.pem -o cacert.pem
The file even contains name of CA’s in plain text. Let’s search for Comodo:
$ grep -i Comodo cacert.pem
Comodo AAA Services root
Comodo Secure Services root
Comodo Trusted Services root
COMODO Certification Authority
COMODO ECC Certification Authority
COMODO RSA Certification Authority
It doesn’t have the one that we need: remember that it must match precisely to the CN field! This also confirms that it is an intermediate CA. We will probably have to find the intermediate CA’s certificate on Comodo’s web site. Let’s paste the name into Google (“COMODO RSA Organization Validation Secure Server CA“) and see what we get.
The first hit will lead us to https://support.comodo.com/index.php?/Default/Knowledgebase/Article/View/968/108/intermediate-ca-2-comodo-rsa-organization-validation-secure-server-ca-sha-2 and sure – this is were our intermediate CA is. Let’s download it:
$ curl ‘https://support.comodo.com/index.php?/Knowledgebase/Article/GetAttachment/968/821025’ > comodo.crt
Now let’s check the issuer and subject here as well:
$ openssl x509 -in comodo.crt -subject -issuer -noout -nameopt RFC2253
subject= CN=COMODO RSA Organization Validation Secure Server CA,O=COMODO CA Limited,L=Salford,ST=Greater Manchester,C=GB
issuer= CN=COMODO RSA Certification Authority,O=COMODO CA Limited,L=Salford,ST=Greater Manchester,C=GB
Great! That’s exactly what we need – see that the Subject field (the CN component) matches exactly to the signer of our certificate. We are lucky even with the issuer:
$ grep “COMODO RSA Certification Authority” cacert.pem
COMODO RSA Certification Authority
It is a root CA, that exists in Mozilla cacert.pem – so we have the full chain!
Let’s get back to verifying our certificate from isc.sans.edu. First we need to check which signature algorithm has been used:
$ openssl x509 -in isc.sans.edu.pem -noout -text | grep Signature
Signature Algorithm: sha256WithRSAEncryption
Ok, SHA256 with RSA (great job Johannes on renewing the cert properly :)). What does this mean? This means that the critical parts of the certificate have been hashed by the CA with the SHA256 hashing algorithm and then encrypted with CA’s private key. It’s public key is available in the comodo.crt file we just downloaded (and isc.sans.edu’s public key is in the certificate we got from the web site). Openssl can confirm that as well for us:
$ openssl x509 -in isc.sans.edu.pem -noout -text
…
Subject Public Key Info:
Public Key Algorithm: rsaEncryption
Public-Key: (4096 bit)
Modulus:
00:d4:8f:58:63:f4:30:0b:ad:05:d0:37:f1:69:97:
6e:27:90:a5:dd:43:d7:c5:30:0d:dc:73:80:6a:fc:
…
What we need to do know is the following:
- We need to extract the signature from the certificate and then use Comodo’s public key to decrypt it; with this we will get the SHA256 hash of the certificate
- Then we need to calculate our own SHA256 hash of the certificate
- If those two match: the certificate is signed properly
In order to extract components of a certificate we need to decode it to ASN.1 format. Luckily, openssl can do that for us, so let’s see what we get on isc.sans.edu’s certificate:
$ openssl asn1parse -in isc.sans.edu.pem
…
1582:d=1 hl=2 l= 13 cons: SEQUENCE
1584:d=2 hl=2 l= 9 prim: OBJECT :sha256WithRSAEncryption
1595:d=2 hl=2 l= 0 prim: NULL
1597:d=1 hl=4 l= 257 prim: BIT STRING
So, the last object is actually the signature – it starts at offset 1597, so let’s extract it with openssl:
$ openssl asn1parse -in isc.sans.edu.pem -out isc.sans.edu.sig -noout -strparse 1597
Now we got the file isc.sans.edu.sig, which is RSA encrypted SHA256 of the signature. How do we decrypt it? We need Comodo’s public key, which is available in its certificate, so let’s extract it:
$ openssl x509 -in comodo.crt -pubkey -noout > comodo.pub
Now that we have the Comodo’s public key, we can finally decrypt the SHA256 hash. It will work only if the original has been encrypted with the corresponding private key. We’ll get an ASN.1 structure back so let’s show it properly as well on the screen:
$ openssl rsautl -verify -pubin -inkey comodo.pub -in isc.sans.edu.sig -asn1parse
0:d=0 hl=2 l= 49 cons: SEQUENCE
2:d=1 hl=2 l= 13 cons: SEQUENCE
4:d=2 hl=2 l= 9 prim: OBJECT :sha256
15:d=2 hl=2 l= 0 prim: NULL
17:d=1 hl=2 l= 32 prim: OCTET STRING
0000 – 4b ca b8 23 4d 52 da e1-31 f1 0d b0 ba 3d 33 6b K..#MR..1….=3k
0010 – 0e 3d 68 0f 99 cb 35 43-69 ff 70 d0 1d a6 ef c1 .=h…5Ci.p…..
Yay, it worked. So it has been encrypted properly. The highlighted part is actually the SHA256 hash.
The last step now is to extract the critical parts of the certificate and verify if both hashes match. So what are the critical parts of the certificate? The X509 standard defines it as a so called TBSCertificate (To Be Signed Certificate), and it is the first object in the certificate:
$ openssl asn1parse -in isc.sans.edu.pem
0:d=0 hl=4 l=1854 cons: SEQUENCE
4:d=1 hl=4 l=1574 cons: SEQUENCE
8:d=2 hl=2 l= 3 cons: cont [ 0 ]
10:d=3 hl=2 l= 1 prim: INTEGER :02
13:d=2 hl=2 l= 16 prim: INTEGER :242168A75513741AD195FB622690C91D
31:d=2 hl=2 l= 13 cons: SEQUENCE
33:d=3 hl=2 l= 9 prim: OBJECT :sha256WithRSAEncryption
…
Ok, the first object starts at offset 4, let’s extract it the same way as before:
$ openssl asn1parse -in isc.sans.edu.pem -out tbsCertificate -strparse 4
The file tbsCertificate contains what we need to run SHA256 has over. We can again use openssl for that:
$ openssl dgst -sha256 -hex tbsCertificate
SHA256(tbsCertificate)= 4bcab8234d52dae131f10db0ba3d336b0e3d680f99cb354369ff70d01da6efc1
Remember the decrypted ASN.1 object? Scroll up – or let me paste it here one more time (this diary is already longer than I thought really):
…
17:d=1 hl=2 l= 32 prim: OCTET STRING
0000 – 4b ca b8 23 4d 52 da e1-31 f1 0d b0 ba 3d 33 6b K..#MR..1….=3k
0010 – 0e 3d 68 0f 99 cb 35 43-69 ff 70 d0 1d a6 ef c1 .=h…5Ci.p…..
Yay! It’s a full, 100% match. So the certificate is correctly signed by Comodo’s intermediate. We could now repeat all the steps to verify if the intermediate CA is correctly signed by the root CA that we got from Mozilla’s cacert.pem, but we can also have openssl do that for us, we just need to tell it with CA file to use:
$ cat comodo.crt >> cacert.pem
$ openssl verify -verbose -CAfile cacert.pem isc.sans.edu.pem
isc.sans.edu.pem: OK
And that get’s us to the end of verification.
